From Sketch To Completion—Datsun 240Z
I field a lot of questions about how I create my illustrations and have struggled mightily over the years to describe my technique without putting my inquirers to sleep. So, going with that old saw “A picture is worth a thousand words”, follow along while I taking a crack at posting a sequence of progress images that might give you at least some sense of how I do what I do. I’ve included a gallery so you can sequence the images without having to read through each step.

Basic outline and wheels plus a few other bits to help give me a sense of placement
In the beginning…
All of my drawings start with a simple outline where I set the wheel base and the tire diameter which become the basic measurements that allow me to accurately arrive at the sizes and placements of everything else. I also set the horizon, background highlight and shadow and other standard elements I include in almost every drawing. Once I have the basics set, I start acquiring all of the photo references I’ll need to draw the various bits as well as research the history of the car to get a sense of its development curve—all necessary to inform decision on which part version to use for a particular year.

Starting body color and basic highlights and shading to make sure I have the body proportions right
Roughing in the body…
With the outline set, the next step is to rough-in the body and add a few of the basic highlights and shadows to help give it some shape. When I first started illustrating, I would draw the cars in pretty much the same way you might build one—wheels, frame, drivetrain and running gear—penning in the body near the end of the work. That was the wrench part of me getting into things. Some years back, I had assignment to produce a number of illustrations for Karl Ludvigsen’s seminal Porsche book, Porsche—Excellence Was Expected. The images were exteriors only and was the perfect opportunity to develop my shading and highlighting techniques.

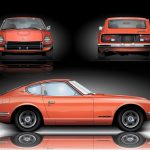
Front view plus a little updating to the profile shading and details
Setting the background…
Most of my art features just the profile view but I’ve recently started to include front and rear views in selected pieces. Because the print dimensions remain the same whichever background style I go with, it means reorganizing the available space. When I draw the front view, I also set the horizon for the rear view so they’re identical. During this particular drawing session, I modified the shading on the profile view by softening the primary highlight that marks the character line and added a second reflection about mid-side to relieve some of the slab look from the roughed in version. Additionally, I added the wipers, seat profile, and fuel door detail—all helpful to get a more developed sense of where things are headed.

Rear view added and few more details on the profile updated
Adding the rear view...
Adding the rear view completes the basic drawing. It takes quite a bit of futzing to get the sizes and placements of the front and rear views set in relation to the profile. No two drawings where I use this layout are alike because the width and heights of each car are different and the goal is to arrive at pleasing proportions and good balance within the space. I went back and forth on a couple of details on this view and, in particular, on whether to include the very early Series 1 license lamps in the rear view or to go with the much cleaner look of the newer style lamp mounted above the plate. In the end, I liked the authenticity of the, frankly, clunky looking bumper mounted lamps. Sometimes, it’s the smallest details that create the most consternation.

Starting the cutaway with the interior
Starting the cutaway…
And now the part I assume you’ve all been waiting for…the cutaway. I almost always begin this stage by penning in the door cards and hardware. It just gives me a sense of the space. From there, I move on to what’s behind the seat, the kick panel, center console and, in this situation, the lower door glass. At this stage I don’t generally bother with setting the opacity of a particular element but, for the 240Z, because there was going to be a lot going on in the door area, I used the lower glass as a starting point to give me reference for the other details that would occupy the same space. Figuring which elements to feature and which to omit is largely a matter of creating some visual balance. At this stage of the work it’s truly about being able to see all of the parts and the whole at the same time.

Developing layer balance in the door area
Developing layer density…
All of my work is created in Adobe Illustrator which allows me to exert an infinite amount of control over the opacity of each element. In this progress image I’ve drawn in the window lift, seat, transmission tunnel, emergency brake, and gear lever as well as filled in a few more details in the rear of the Z. The door area is looking pretty cluttered and not at all what I’m looking for but the important stuff is there and gives me the chance to begin playing with how I may have to clip certain parts of a layer to permit other parts to be seen while not creating visual dissonance…no easy task. It’s clear that there’s going to be some work ahead of me to get the result I want. At this point, all of that beautiful body work, is gradually disappearing… to reappear once I have the innards drawn.

Filling in the rear of the car
More rear detail…
I begin the rear suspension. There’s going to be a lot going in in the rear wheel area with the fuel and expansion tanks, the rear strut, fuel filler and brakes all competing to be seen. With each new part I add, I also perform minor edits on a whole host of other details so, even though, at first glance, and area may look the same as it did in the previous version, there have been numerous subtle changes made. This is definitely not a process of “you draw and it’s done” but more an evolution of a particular piece as it relates to the total work. I was really excited to see that, after drawing in the rear strut, I saw that the strut tower was correctly placed. Yeah! I also added a shading panel (going from left to right) at the very rear. I wanted to see a transition from solid to transparent in the rear elements and this was a simple way to achieve it.

Rear wheel area balanced, front suspension started
Things really get going…
In this version completed on 7/11 at around 2 in the afternoon, I’m working on the engine bay, have finished the rear brake, differential, and drive shaft and created initial opacities for the cutaway detail in the rear wheel area. I’m sure to be asked why I’ve included elements in the engine bay that would obviously be hidden by the engine. Simple answer is that the 240Z prints will be available in both left-hand and right-hand drive versions so there’s some economy of scale at work here which will save time if I get and order for a right drive car. It’s interesting to note, given all of the modern engineering that went to the 240Z (the year here is 1969) and Datsun chose to use a resistor ballast on the coil, something most manufacturers had moved on from. I’ve reworked the rear wheel area to bring the brake and differential more forward without sacrificing the wheel detail and have begun work on the front suspension. There’s still a long way to go but the 240Z is beginning to take shape.

Transmission in and front wheel are with a preliminary balance
So, it’s been a few days since the last post. I took a bit of a break but am back to it adding the transmission and doing a preliminary balance on the front wheel area. The gearbox took forever and is composed of several layers—the inner case, the gears and shafts, the outer case, and all of the ribs and other bits. Fortunately I was able to source a couple of great images off the Internet that gave me the set up on the gear clusters but the case was different matter altogether. In the end I got the deed done but it took longer than expected. Tomorrow I’ll get going on the engine.

The engine isn’t quite finished but there’s enough there to give you the idea.
The engine is in…
Drawing the engine and all of its parts takes a while as well as a ton of research. To create the effect, I start with the bare block, cylinder head, valve cover , and sump pan then add the rotating assembly, timing cover, water pump and all of the other bits. I’m thankful that there’s a robust Z-car restoration community and that they are prolific about documenting their work, It’s made the research end of things so much easier than it could have been.

Almost there. Most of the engine and engine bay area are done with just a few bits to go.
Almost there…
Since the last image, I’ve added the heater, wiper motor, fuel pump, filter, engine light, most of the plumbing along with a bunch of fiddling to get everything in the right place. I’ve also been playing with the body and highlight overlays to get an idea of how they will play out in the final illustration. I’ve also been trying various ideas in the front wheel area trying to keep some semblance of the wheel cover while simultaneously allowing the engine, suspension and brakes to show through. Not quite there yet but I’m liking the direction things are headed.

1969 Datsun 240Z Series 1
Finally done…
About 160 hours, 24 days, and 283 layers after I started, the Datsun 240Z is ready to be presented. Each new drawing I experiment with new techniques and this one is certainly no exception with a completely new ay to create the contour shading as well as a new build sequence being the dominant things I tried. and both will be used on subsequent work.
If you’d like to purchase a personalized, limited edition print of the first Z-car, please click here.
-

- Basic outline and wheels plus a few other bits to help give me a sense of placement
-

- Starting body color and basic highlights and shading to make sure I have the body proportions right
-
- Front view plus a little updating to the profile shading and details
-
- Rear view added and few more details on the profile updated
-

- Starting the cutaway with the interior
-

- Developing layer balance in the door area
-

- Rear wheel area balanced, front suspension started
-

- Filling in the rear of the car